
This post contains affiliate links. As an Amazon Associate I earn from qualifying purchases. If you click a link and make a purchase, I may receive a small commission at no extra cost to you.
Recipes Used:
Products used in this video (Affiliate links)


Video Summary
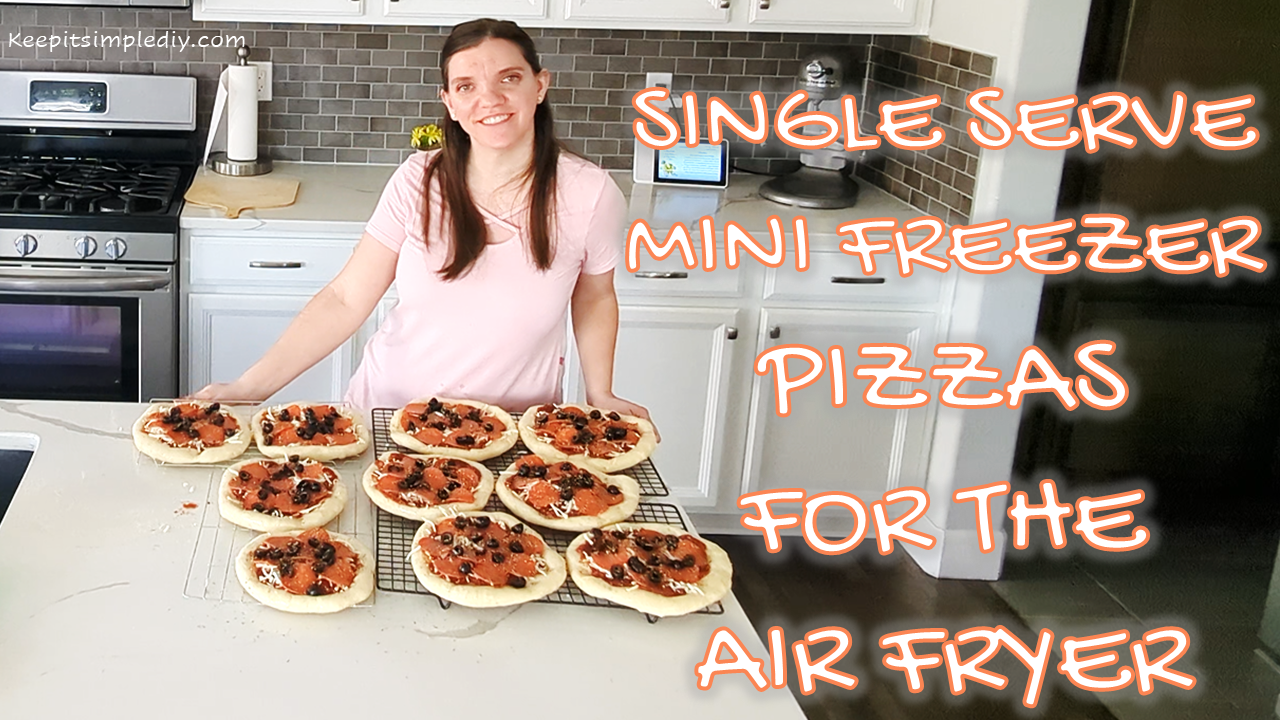
Today I’m making mini pizzas that you can cook in your air fryer straight from the freezer! This is one of my favorite freezer meals because it’s perfect for when you’re eating alone and don’t want leftovers (which can be hit or miss with pizza). I’m taking my usual pizza dough recipe that I double to make five large pizzas, but instead I’m making 10 smaller pizzas that fit perfectly in the air fryer. I walk you through the entire process – making the dough from scratch, letting it proof, dividing it into portions, parbaking the crusts at 400 degrees for five minutes each, making homemade pizza sauce, adding all the toppings, and then wrapping them in aluminum foil to freeze. The key is parbaking the crusts first so they’re firm and partially cooked before freezing, which means you can go straight from freezer to air fryer whenever you need a quick individual meal. I also share tips about dough consistency, how climate affects flour measurements, and my trick for proofing dough faster using a microwave with hot water. Come make these convenient freezer pizzas with me!
Video Transcript
Hello everyone, welcome back. Today I have a very exciting video. We are going to be making mini pizzas that you can cook in your air fryer from frozen. It’s a great freezer meal for when you are all alone and you need just a quick meal and you don’t want to have a lot of leftovers, because as we know, pizza leftovers are hit and miss. Sometimes fantastic and sometimes just not.
So I do have a recipe that I typically use to make larger style pizzas. I usually double the recipe and make five large pizzas, and what I’m going to do instead today is I’m still going to double the recipe, but I’m instead going to make 10 smaller pizzas that’ll fit in my air fryer. I can put these in the freezer and have them whenever I need them. So I’m going to show you the dough, we’ll let the dough proof, and then we will get going on making these pizzas. Come along.
All right, I’m going to start by adding my two and two-thirds cup of water into my mixer, and then I need one tablespoon plus one teaspoon of sugar per recipe, so it’s two tablespoons and two teaspoons of sugar. So two tablespoons and then two teaspoons is about two-thirds of a tablespoon, so I’m just gonna eyeball that. And then yeast, I need to put in two and a third teaspoons, which is a little shy of a tablespoon. Here’s what I’m doing, and I’m gonna do that twice. And I keep my yeast in the freezer. I’ve found that it stores best that way, and I’ve never had my yeast die putting it in the freezer.
I’m just giving it a little mix and then I’m gonna let it sit here for just about five minutes and proof.
It’s only been about two and a half minutes, but our yeast is proofed. You can tell by the way it looked on the top. It doesn’t look so splotchy anymore. It’s got some bubbles that have come up. I am going to add the rest of the ingredients to this dough. It calls for two teaspoons of salt, and that’s one and a third tablespoons if I’m doubling, so I’m gonna do one and a third tablespoon. And two tablespoons of olive oil, and two tablespoons doubled is a quarter cup. And then we’ll start adding our flour a little at a time. So it says I need three and a half cups per recipe, so that would be seven cups of flour. So I’m gonna start with four cups and then we’ll start mixing it.
I have six cups of flour in here. I just added two while it was mixing, and I just want to feel it to see what the consistency is like. So it’s definitely sticky, which is expected since I don’t have all of the flour in yet, but I just want to make sure if I really should add the full amount.
How much flour you add in recipes, especially dough recipes, depends on a lot of different factors. The humidity in the air is a big one. Time of year, where you live. I live in a dry climate, so a lot of times I don’t need as much flour just because the flour isn’t as moist as it would be in a more wet climate.
All right, that does mostly combined. I’m just going to check again and let’s see what I want to do here. Feels good, but like, I think I’m gonna add most of the rest of that cup and just leave a little bit of it out, and then we’re going to let it go until it’s nice and smooth.
I know it was time to be done because I started being able to smell my mixer, the gears. I probably had it on too high of a speed, but the gears definitely don’t like working too hard.
All right, we’ve got that out. I’m gonna take the bowl off and what I’m going to do is just take this dough out. I’m going to add a little bit of olive oil to my bowl. That’s probably a lot of olive oil. And I’m just going to take this dough and form it a little bit into a bowl. Roughly, this dough actually feels really nice. Okay, I’m gonna put it down, swirl it around, flip it over, swirl it around some more. The goal here is to get all the sides covered in the oil so that way it doesn’t dry out while it proofs.
All right, and what I’m going to do with this is I’m going to take it and stick it in my microwave with a cup of boiling hot water, so it’ll proof a little bit faster. I’m not going to turn the microwave on. I’m just going to set it in there. And yes, my microwave is a mess. We’ll close it. The mess is now hidden.
All right, this has been proofing for a little while now. I didn’t actually look at the time when I put it in, but it has risen very high up and I’m going to divide this into 10 equal pieces and let it do a second rise.
I’m going to let these rest for probably about 20 minutes or so, and in the meantime I’m going to preheat my oven to 400 degrees to do the initial cook on each of them.
It’s okay that they’re all different sizes because I’m going to be eating them individually. I’m not going to be eating them all at once. They’re not going to be like a pan of rolls where you want them to look nice and even. If I did want that, I would have taken the scale out, but I didn’t think that was necessary. So these will rest for a while. I will get them into pizza shape and put them in the oven, but for now let’s preheat the oven.
Our oven is now preheated and the pizza dough has sat for about 20-25 minutes, so I am going to put my mat back down. And then I want these pizzas to fit in my air fryer, so I grabbed one of my air fryer sheets and I just want to kind of hover it over to see how big I want to make them. And it looks like eight inches is about as big as I can fit on here. So pizza dough ends up shrinking a little bit when it cooks, so I can probably go out a little bigger, maybe to nine inches, and be fine.
So I’m going to start by just adding some cornmeal onto my pizza peel, and that’s so the dough doesn’t stick to the pizza peel when I put it in the oven. So what I’m going to do here is I’m going to press it into shape and then stick it in the oven to parbake for about five minutes. And parbaking just means I’m going to partially cook the crust, and then that way the crust will be partially cooked. I can put all the toppings on it, and from there it goes straight into the freezer. I don’t have to worry about cooking it right away, but it’ll be nice and firm rather than just doughy in our freezer. So let’s start.
I’m just going to start by pressing this down, and hopefully it’s had enough time to rest, and then I’m going to stretch it. Sometimes I stretch it on the mat and sometimes I stretch it by hand. Kind of just depends what dough I’m using, honestly.
Last time I made pizza, I made sweet Thai chili pizza and I made barbecue pizza, and I used a sourdough pizza dough for my pizza for those.
So let’s see where we’re at. We’re about at eight. I’m just gonna give these a little bit more of a stretch. And then you also want to poke some holes into your pizza dough when you put in the oven, so hopefully you don’t end up with quite so many big bubbles.
Do you see how it’s pulling back in on itself? That’s the glutens. The more relaxed the glutens are, the more the dough will spread. So probably towards the end of these, the dough will be getting quite a bit further out.
Okay, I’m gonna poke some holes, and you could use a docker, which is like a roll that just does it, but a fork works great. Stick it on here and we’re gonna put in the oven, set a timer for five minutes. And I just set a timer for five minutes. That’s how long I want to parbake them for.
I can fit two pizza crusts on my pizza stone at once, so I’m gonna keep going and make this one, and we’ll try to get a good system going where there’s just a few minutes between each. And just by holding the edge I kind of get that traditional pizza edge. Okay, make sure it’s not going to stick, and I’m going to throw this one in too. Set a timer for five minutes.
I can tell that this dough is really tight to itself, so I probably should have let it sit a little bit longer. That’s something I have trouble with is I don’t always give it enough time. I’m not always patient enough to wait.
I don’t currently have room in the oven for this one, but I figured I’d get it started because I’ve got actually three minutes and 30 seconds to go, so I’m quite ahead of myself this time. I like to get this rotation where I put one in, put another one in, so then I have two, and then how it works, I get one ready, I take one out, and then I put this one in. And then I’m getting the next one ready, and then I will take one out and put that one in.
So I’m not going to poke any holes into it until after I’m ready for it to go in, just because I know it’s going to need a little bit more stretch. So I actually have two timers set up on my smart display over here, and that’s how I keep track of where I’m at. There’s no way I could remember which pizza has been in for five minutes and which hasn’t. It’s enough to try to remember which side I put the newer one on.
So we have about 30 seconds and then we’ll be ready to take this first pizza out of the oven. I did set up a set of cooling racks so I can put them over there to cool. We won’t be putting any of the toppings on it until they’re completely cool.
All right, it’s go time. Stop. All right, one down, nine to go, if you count the one that’s already in the oven. I’m gonna quickly just poke this one, add some more cornmeal to my peel.
And I am going to mix up the sauce. I have some canned tomato sauce, but it’s pretty thin, so I’m going to add some tomato paste to it. I’m not sure if this will be enough for all the pizzas, but I’ll start with this and we’ll see where we go from there.
Okay, now I already know it’s going to need a little bit more spices than what I put in it when I canned it. This batch of sauce also turned out a little on the bitter side, so I will add a pinch of baking soda to it to kind of mellow that out.
All right, I grabbed out all my big spices just because I know I’m going to be using a lot of them here, and it just doesn’t make sense to have to refill all my little jars. So I’m adding a little bit more garlic powder and granulated onion, also adding some Italian seasonings and then some oregano from the garden.
And I am going to put away everything except for the Italian seasonings. And then I got out garlic salt. I like to put garlic salt around the edge of my pizzas. I’ve also got some olive oil. I’m just going to put in this little bowl so I can brush the edges. Oh, and I didn’t finish stirring. Let’s do that.
I’m just going to add a little bit of olive oil around the rims and then come through with some garlic salt to season the crusts.
All right, the pizzas are done. I’m going to pick one to stick in the oven, and then I’m going to wrap these up and get them into the freezer.
All right, I have these all wrapped up. I’ve just put them in some aluminum foil and put them on a tray. I’m going to freeze them flat, and then once they’re frozen I’ll take them off this tray and I might stand them up. I might not. We’ll see. But these are ready to go in the freezer, and let me show you the pizza in the oven.
I actually want to increase this temp. I was gonna do 450. I think 425 will be good. Here’s where we’re at. We’re coming along. I’m gonna bring these into the freezer and I’ll see you back when the pizza’s out of the oven.
Look at that. That looks fantastic. I am going to grab my plate and my pizza peel. Let’s see if I can do this one-handed. Look at that. I’m gonna give it just a second to sit and then I will cut it.
All right, here it is. It’s not as crispy as it would be if I put it in the air fryer, but it’s still quite nice. Whoops. Delicious.
I do want to say thank you so much for being here with me in the kitchen today. I had a blast making pizzas with you, and I hope to see you next time. Bye!


