
This post contains affiliate links. As an Amazon Associate I earn from qualifying purchases. If you click a link and make a purchase, I may receive a small commission at no extra cost to you.

Welcome back to the blog! This project was one of my favorites because not only is it visually appealing, it’s extremely functional! This post shows the full process of my master closet renovation.
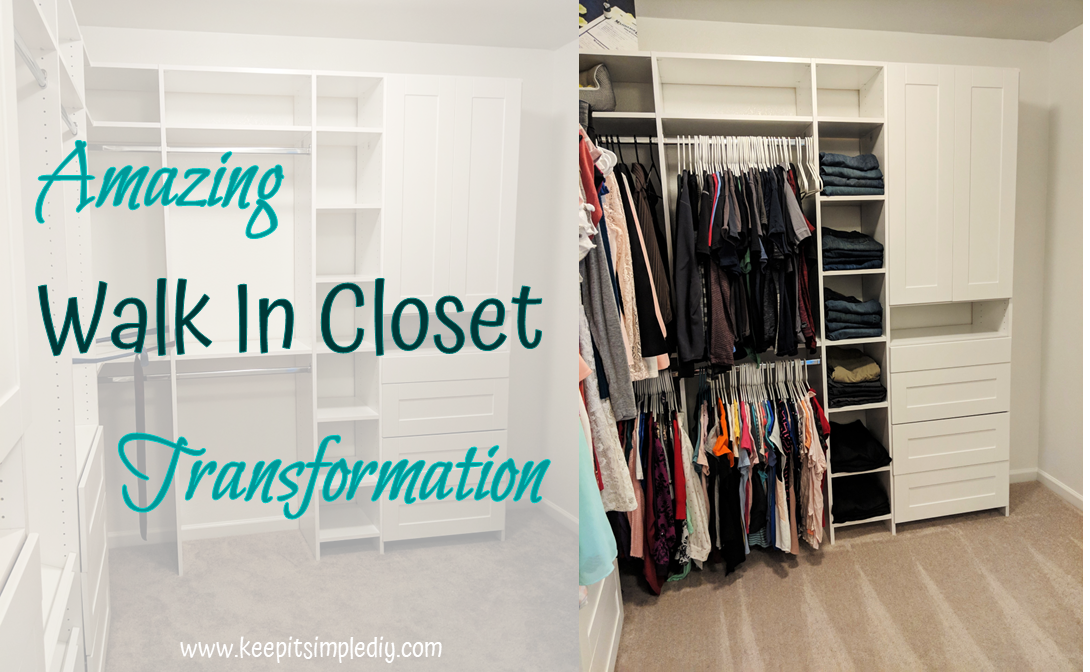
Before the Renovation
Before I get to explaining how this transformation took place, let’s take a look at the before!
This is a massively large walk-in closet in the master suite. The only problem was that we had trouble fitting things into the closet because of it’s layout.
There was only one bar for clothes that ran around the whole room. There weren’t any shelves or drawers. You can see that we tried using old furniture to store things but even that wasn’t very helpful.
I knew I really wanted the built in closet look so I got a quote from a closet company in town. The quote for what I wanted was $10,000! With that option out of the picture, I got looking around. Should I build the closet from scratch? Were there pre-made closet kits that would work?
This was not a quick process. I got stuck for a couple of years when trying to work out the specifics.

I started by measuring the room and noting the dimensions on my notes in excel. Ultimately, I found a closet system that I liked but the pieces were a la cart.
Using my measurements and the section sizes available, I drew up a draft plan of where each sized section would go.
Planning the Closet Renovation
Next, I needed to plan what would go into each section in the closet. This got a bit more tricky as I needed to measure how much room I would need for each type of clothing. I also had to consider if I planned to ever have more of a certain item. After some trial and error, I had a plan.

Once I determined the closet layout, I calculated how much of each piece. I used this number and the cost of each piece to determine the subtotal cost of the project. And yes, the project that I was quoted over $10k from a local place would be $1250 with me doing the project DIY style.

I double checked my calculations many times before placing the order. The order was pick up only and the store is about an hour and a half away from the house. This wasn’t one of those projects where you just run to the store if you need another part.
We picked up all of the pieces and staged them in the office area until I was ready to start the project. Now if this doesn’t look daunting, I don’t know what does!

Prepping the Room
Of course, with any project, there is a lot of prep that needed to be done before the closet could be installed. First, I took everything out of the closet including the full 134″ piece of wood that acted as the shelf above the clothes rod. I could not believe that was one solid piece. Once I had the room completely emptied of all items and the builder grade closet set-up, I patched the holes in the wall and retextured over the patches.

Once the patching and texture were dry, I prepped the area for painting.

Three coats later and the walls were white and the closet building portion of the project was ready to begin!

Building the Closet System
I started by building all of the drawers. I did this in my living room while watching TV the day before I emptied the closet.
This process was successful but also lead to a lot of trash that needed to be picked up!
Once the drawers were built, I brought them to the bedroom and filled them up. My thought was that I might as well fill them up since I had to move the clothes out of the closet anyways.

Building the closet system was very intimidating since I’m very short and did the project by myself. I had to take it literally one step at a time because if I looked ahead a few steps, the project seemed too daunting. There were instructions on how each piece would fit to another piece but because the pieces were a-la-carte, there weren’t instructions for how to build the whole system. Luckily, I’ve made my fair share of RTA furniture before.
Finally, I had the closet system put together! I held the two pieces together with a ribbon since it was late at night. The next day, I secured the closet system to the wall and removed the ribbon.


After the Renovation
The final step was to add the clothes back into the closet. It’s amazing how I didn’t even use two full walls of the closet but was able to fit way more clothes than before! I have since added a vanity I bought from Amazon to the left of the closet and some laundry baskets against the empty wall.


Enjoyed this DIY? There’s more where that came from!

And even more here!


