
Recipes Used:
Products used in this video (Affiliate links)


Video Summary
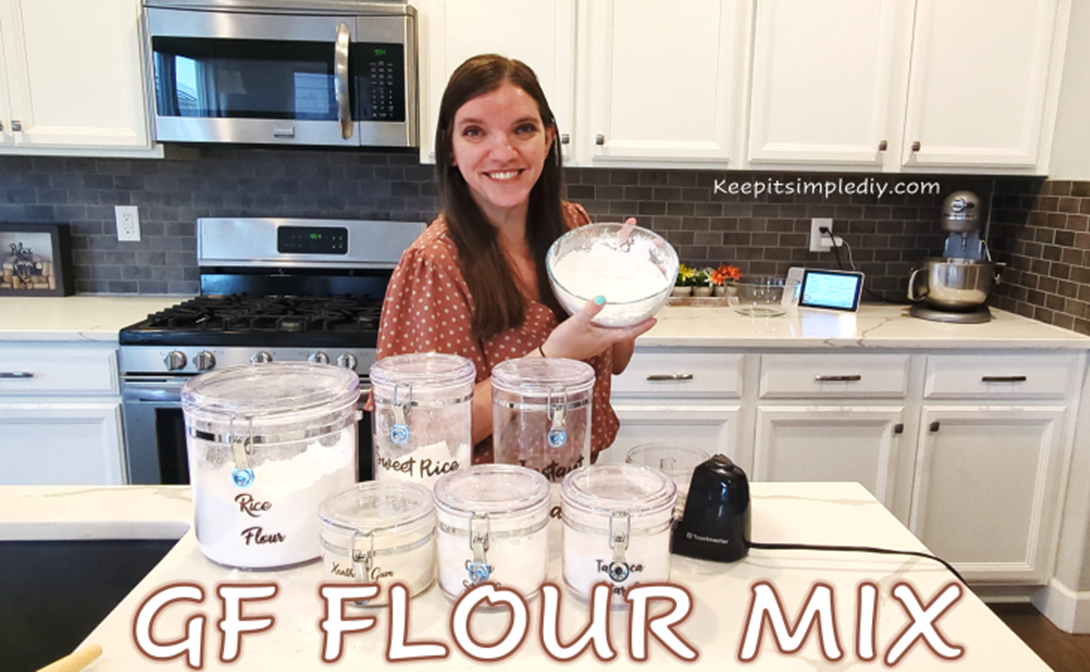
Hey everyone! It’s a gloomy morning so I thought it would be perfect to make banana bread, but I’m doing something special – I’m making a homemade gluten-free flour mix first! For about two years I ate completely gluten-free (my body kind of forced me into it), and during that time I learned so much about gluten-free baking. I really missed all my homemade breads, pizzas, waffles, and pancakes, and the biggest thing I missed was kneading glutenous dough. I researched extensively about different flours and tried lots of store-bought gluten-free flour mixes, but I didn’t like them – they had the wrong flavor, texture, or consistency. So I developed my own custom flour mix using the best ratio I discovered: two parts flour to one part starch. Today I’m showing you my exact mixture that’s perfect for banana bread (which I’ll be making in my next video). This banana bread turned out so good that when I served it to people, nobody could tell it was gluten-free, and I don’t even usually like banana bread! My mix uses rice flour as the base, sweet rice flour (also called glutinous rice flour – it doesn’t have gluten but gets sticky like mochi), oat flour (you can make your own by blending oats in a food processor, but make sure to use certified gluten-free oats to avoid cross-contamination), tapioca starch as my main starch (because tapioca and banana go together great), a little cornstarch for texture, and xanthan gum as the binder (one teaspoon per two cups of mix). I’m making two cups today for my banana bread recipe. A really important tip: sift everything to avoid clumps, especially the tapioca starch! This mix is perfect for sweet quick breads and cakes, though I’d use different flours like cassava and potato starch for savory breads. Money-saving tip: I buy most of my gluten-free flours from our local H Mart Asian market for about $1-2 per bag instead of paying grocery store prices!
Video Transcript
Hey everyone, welcome back. I’m Kari, this is Keep It Simple DIY. It is a gloomy morning, and so I figured it would be great to make some banana bread. And so what I’m going to be doing in this video is getting the flour ready because I am going to make this banana bread gluten-free with a homemade gluten-free flour mix. So this video will be the flour mix, and stay tuned because a future video will be the banana bread.
For a few years, I actually ate gluten-free. It was about two years total. And long story short, my body decided that’s what I needed to do, and so it kind of forced me into that direction. I’ve since come back, and now of course, you know, I’ve made sourdough, I do make bread with gluten. But I learned a lot of skills along the way, and I thought it would be great to pass my skills on.
So while I was eating gluten-free, I was really missing all of the breads because I, for years, made my own pizza, made my own bread, made my own waffles, made my own pancakes. The list goes on and on and on. And the biggest thing that I missed really was kneading dough that was glutenous. I didn’t get that with gluten-free, but I was able to substitute flours and make a lot of my favorite meals.
So I went and researched a ton, a ton, on different flours, how to make the right mix. I used a lot of pre-mixed flours from the store. I really didn’t like them. They were either the wrong flavor, the wrong texture, the wrong consistency. And I really wanted a customized flour for the product that I was making.
And so I went on to research, and what I found was the best mixes are a two-to-one ratio: two parts flours to one part starch. So I have flours over here on my left side, and I have starches over here on my right side. And I’m going to show you the exact mixture that I came up with that is perfect for banana bread.
The banana bread that I’m going to be making in the next video with this flour is phenomenal. I brought this banana bread out and served it to people, and nobody had any idea that it was gluten-free. It tasted that good. And truth be told, I don’t particularly like banana bread usually, but with the gluten-free flour mix I did.
So I know that video is not coming out until next time, so I’ll give you a little teaser: just substitute this flour in any banana bread recipe and you’ll be able to make yourself some gluten-free banana bread.
So let me show you the flours that I’m going to be working with today. I’m going to be working with rice flour. Rice flour is just a great base for any gluten-free flour, so that’s what we’re using.
I’m also going to be using sweet rice flour. This is also called glutinous rice flour. It doesn’t have gluten, but it does kind of get more sticky together. This is what is used to make mochi, and this can get very tacky. So we’re not going to be using a lot of this, but I did want to use a little bit just to make sure that the texture is a little bit, you know, fun.
The next flour I’m going to be using is oat flour. Now if you have oat flour, you can use oat flour. Or if you don’t, you can just take your instant oats or any kind of oats and blend them up. So I actually have this little tiny food processor that I used to blend up my oats to make my oat flour.
It is important to note that if you want this recipe to be gluten-free, you have to make sure to use specifically gluten-free oats or gluten-free oat flour. Oats are naturally gluten-free, but they are produced alongside of wheat berries, and it is possible for there to be cross-contamination from the wheat berries. So in order to avoid that, make sure you choose the gluten-free option.
So those are the flours that we’re going to be using. For the starches, I chose to use tapioca starch and cornstarch. And the reason that I chose these two instead of just choosing one or a different mix is I started with, what three starches do I have in my house? And I had potato starch, cornstarch, and tapioca starch.
So then I went to think, what will taste best in banana bread? And potatoes and banana bread just didn’t do it for me, so I decided to go with these two. Now I’m going to be using mostly tapioca starch with a little bit of cornstarch just to add a little bit of a different texture. And the reason I chose tapioca starch to be the higher quantity is because I thought, okay, what do we use tapioca for? Well, we use tapioca for tapioca pudding. And if I were to eat banana bread, yep, those two go together great. So tapioca starch is the main starch that I will be using.
Now of course, we don’t have the gluten in gluten-free flour, so we do need to use a binder. And that binder is going to be xanthan gum. And I’m going to use one teaspoon for every two cups of mix. So today I’m going to be making two cups of mix because that’s how much I need for my banana bread.
Let me bring you in close and we will get mixed in. So I did get a sifter and I put it on my bowl. You do want to make sure to sift every single part of this flour mixture because some of it can be clumpy and you don’t want to bite into a clump of tapioca starch. So we’re going to make sure to sift it. That’s something I don’t typically do with a regular flour.
But what we’re going to do is I’m going to add two-thirds cup of rice flour, and then I’m also going to add a tablespoon of rice flour and a teaspoon of rice flour just to get me to the right amount that I want.
I started off using a two-thirds, one-third, one-third to get to my parts, but I decided to back off a little bit on the sweet rice flour. So instead of using one-third cup of sweet rice flour, I’m only going to use a quarter cup. And so to do that, I’m just going to use my half cup measure that I have and I’m going to just fill it halfway.
And then last up for the flours, we need one-third cup of oat flour. Okay, and my oat flour didn’t get blended super well. I could have used the blender, but I didn’t feel like it, so it’s a little bit clumpy, which is totally fine. That’ll turn out just fine in the recipe.
Okay, I’m going to sift some of this before I add in the starches, just to make sure I don’t get it too full. Okay, I’m going to leave that little bit there, and I will end up dumping in whatever doesn’t sift through. I’m not worried so much about there being bigger chunks. It’s more of I don’t want big clumps in there.
All right, so we are going to use a half a cup of tapioca starch. And this is the one that can get clumpy, really. Potato starch is the one I’ve noticed gets the most clumpy, but I want to sift the tapioca starch as well. So I added the half cup of tapioca starch, reread my recipe and remembered I wanted to add an additional tablespoon of it.
And then I want to add one and three-quarters tablespoon of cornstarch because I don’t want too much of the cornstarch flavor and texture, but I do want a little bit. And so to get that three-quarters of a tablespoon, I’m just going to eyeball it and throw that in. I’m not worried about this being the exact perfect quantities. I just want to make sure that we’ve got, you know, the approximate ratio here. The recipe will still turn out just fine even if your ratios end up a little off.
And there’s our teaspoon of xanthan gum. Okay, so that’s all we needed for this mix. I’m just going to sift the rest of this through.
All right, I am confident that there aren’t any clumps in here at this point. This part is just the oat flour that didn’t completely break down because I didn’t use a blender. That would do it. So I’m gonna dump those in and then give this a good mix as well. All right, there we go.
All right, so there you have it. This is the best gluten-free flour mix to make any type of quick bread or cake. It works perfect with those sweet recipes. Now I wouldn’t necessarily use this specific mix if I was making something more on the savory side, like if I was trying to make a rosemary bread or something. You absolutely could, but this is just what I prefer for more of a sweet bread, mainly because I’ve used the oat flour and the tapioca starch. Otherwise, I might trade that out to be something more like potato starch and cassava flour.
But we are going to be using this in our next recipe. Before I end the video, I wanted to give you a few tips and tricks about gluten-free flour. So these flours can be pretty expensive if you buy them from your local grocery store, and we don’t want to be spending an arm and a leg to make our own gluten-free flour. Gluten-free flour is expensive on its own, so by making it ourselves, we want to be saving some money.
So where I get most of my gluten-free flours is from our local H Mart, which is an Asian market, and they run about a dollar to two dollars a bag. They used to be able to get them for a dollar. I think they went up to $1.99 a bag. The bags are pretty small, but I’m able to make a lot more than if I were to buy it from the store.
I will put a link down below to these specific flours that I use, that way you know what you’re looking for. The links down below do have them at a higher price, so if you can find them locally for two dollars, that would be ideal. But I did want you to be able to see at least what the bags look like.
So now that we have our gluten-free flour mix, we are going to be making our banana bread. So if you liked this video, please give it a thumbs up and subscribe because the banana bread is coming. I am very happy that you joined me in my kitchen today, and I will see you next time. Bye-bye!


